Author: David Fekke
Published: 5/16/2021
One of my favorite laws is Atwood’s Law. Atwood’s Law states: any application that can be written in JavaScript, will eventually be written in JavaScript. I have been shocked at the kinds of applications that can be written using JavaScript.
If you are not familiar with Jeff Atwood, he writes the popular blog Coding Horror.
When you ask yourself should I use Node.js to process images, this is a question that definitely qualifies for Atwood’s Law.
Image Processing
One of the first programming jobs I had in the 90s was writing an AppleScript that could leverage Adobe PhotoShop to create images for a high resolution library the company I was working for at the time was trying to build. At the time Adobe did not have scripting capability built into Photoshop like they do know. I found a Photoshop plugin that would allow me to write code that could command Photoshop to automate our imaging needs.
Nowadays there are all kinds of tools at our disposal for image processing that can be scripted. But what about Node.js? It turns out there are a lot of tools for image processing in Node.js that are available through NPM.
There are a number of use cases where you might need image processing. Here are a couple of those use cases;
- Convert to Different file format
- Resize the image
- Crop the image
- Make a Composite image
- Do Color correction
- Create Blurs and Effects
A couple of years ago I built a tool called jimp-appicon for creating icons for iOS/iPadOS and Android apps. Apple and Google both require many different dimensions of these square images in order to create icons for all of the different devices with varying screen sizes.
Jimp
Jimp, a tool named after the popular GIMP image processing application, is an image processing tools written entirely in JavaScript. It does not have any external dependencies, and can run on any processor architecture.
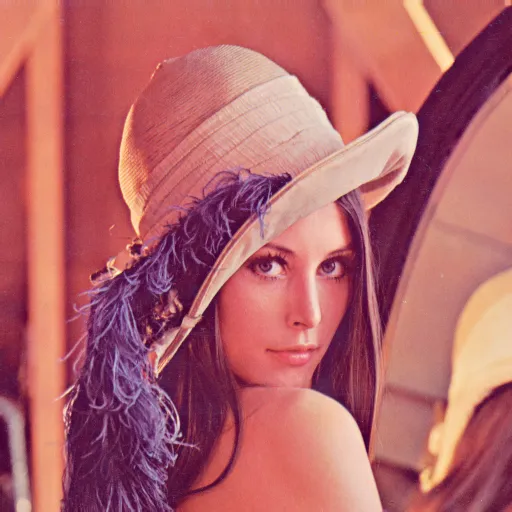
Jimp also has an easy API to understand with a promise library allowing Node.js developers to run multiple operations on an image. In the following example we will take the Lenna image, and resize it 256 pxiels square, make it a greyscale and save our results as a JPEG. Here is the original image;
Now we will u run the following script to create our new greyscale JPEG image.
import jimp from 'jimp';

jimp.read("lenna.png").then(function (lenna) {
    lenna.resize(256, 256)            // resize
         .quality(60)                 // set JPEG quality
         .greyscale()                 // set greyscale
         .write("lena-small-bw.jpg"); // save
}).catch(function (err) {
    console.error(err);
});
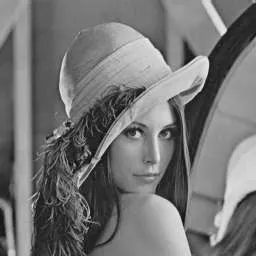
The resulting image will look like the following image;
Sharp
I am came across the Sharp image module a couple of years ago when I first started using Gatsby. Gatsby uses the Sharp image module in their image plugins. This is exetermely fast because it is mostly written in C++ code as a native module for Node.js. And unlike some of the other native image modules for Node.js, it will compile and run on most processor architectures. So if you are running on a large x86_64 server or on a Raspberry Pi running on an ARM processor.
import sharp from 'sharp';

sharp('lenna.png')
  .rotate()
  .resize(200)
  .jpeg({ mozjpeg: true })
  .toFile('output.jpg', (err, info) => {
    if (err) console.error(err);
    console.log(info);
  });
PhotoShop and Adobe Generator
PhotoShop is probably my favorite application of all time. I have been using PhotoShop for 30 years. Adobe created a way in 2013 to add plugins to PhotoShop using Node.js. It is called Adobe Generator-core. If there is specific functionality that you want to use in PhotoShop, you can now write Node.js code that will add a plugin option to PhotoShop and execute that script. Here is an example of a generator plugin that can take the path called “Path 1” and create a new layer in PhotoShop with just the contects of that path selected;
(function() {
    "use strict";

    const PLUGIN_ID = require("./package.json").name,
          MENU_ID = "makelayerfrompath1",
          MENU_LABEL = "$$$/JavaScripts/Generator/Make Layer From Path 1/Menu=Make Layer From Path 1";

    var _generator = null,
        _currentDocumentId = null,
        _config = null;

    // Using Adobe ExtendScript to create a new layer from a path named 'Path 1'
    const makeNewLayerFromPath1 = `if (app.documents.length > 0) {
        var docRef = app.activeDocument;
        var n = docRef.pathItems.length;
            if((n>0)&&(docRef.pathItems[0].name=="Path 1" ))  {
                docRef.pathItems[0].makeSelection();
                docRef.selection.copy();
                var coolLayer = docRef.artLayers.add();
                coolLayer.name = "My Layer";
                docRef.paste();
            }
        }`;

    /*********** INIT ***********/

    function init(generator, config) {
        _generator = generator;
        _config = config;

        console.log("initializing generator getting started tutorial with config %j", _config);

        _generator.addMenuItem(MENU_ID, MENU_LABEL, true, false).then(
            function() {
                console.log("Menu created", MENU_ID);
            },
            function() {
                console.error("Menu creation failed", MENU_ID);
            }
        );
        _generator.onPhotoshopEvent("generatorMenuChanged", handleGeneratorMenuClicked);

        function initLater() {
            _generator.onPhotoshopEvent("currentDocumentChanged", handleCurrentDocumentChanged);
            _generator.onPhotoshopEvent("imageChanged", handleImageChanged);
            _generator.onPhotoshopEvent("toolChanged", handleToolChanged);
            requestEntireDocument();

        }

        process.nextTick(initLater);

    }

    /*********** EVENTS ***********/

    function handleCurrentDocumentChanged(id) {
        console.log("handleCurrentDocumentChanged: " + id)
        setCurrentDocumentId(id);
    }

    function handleImageChanged(document) {
        console.log("Image " + document.id + " was changed:"); //, stringify(document));
    }

    function handleToolChanged(document) {
        console.log("Tool changed " + document.id + " was changed:"); //, stringify(document));
    }

    // This is the method that gets called if the user clicks on a the menu.
    function handleGeneratorMenuClicked(event) {
        // Ignore changes to other menus
        const menu = event.generatorMenuChanged;
        if (!menu || menu.name !== MENU_ID) {
            return;
        }

        sendJavascript(makeNewLayerFromPath1);

        const startingMenuState = _generator.getMenuState(menu.name);
        console.log("Menu event %s, starting state %s", stringify(event), stringify(startingMenuState));
    }

    /*********** CALLS ***********/

    function requestEntireDocument(documentId) {
        if (!documentId) {
            console.log("Determining the current document ID");
        }

        _generator.getDocumentInfo(documentId).then(
            function(document) {
                console.log("Received complete document:", stringify(document));
            },
            function(err) {
                console.error("[Tutorial] Error in getDocumentInfo:", err);
            }
        ).done();
    }

    function updateMenuState(enabled) {
        console.log("Setting menu state to", enabled);
        _generator.toggleMenu(MENU_ID, true, enabled);
    }

    /*********** HELPERS ***********/


    function sendJavascript(str) {
        _generator.evaluateJSXString(str).then(
            function(result) {
                console.log(result);
            },
            function(err) {
                console.log(err);
            });
    }

    function setCurrentDocumentId(id) {
        if (_currentDocumentId === id) {
            return;
        }
        console.log("Current document ID:", id);
        _currentDocumentId = id;
    }

    function stringify(object) {
        try {
            return JSON.stringify(object, null, "    ");
        } catch (e) {
            console.error(e);
        }
        return String(object);
    }

    exports.init = init;

    // Unit test function exports
    exports._setConfig = function(config) { _config = config; };

}());
While this is extremely neat that it is possible to use PhotoShop and Node.js together, it is not practical to keep both Node.js and PhotoShop on the same server. Plus PhotoShop only runs on Windows and MacOS.
Make an AppIcon with Sharp-AppIcon
I decided to write a new AppIcon maker using Sharp because it is so performant. It can create all of the icons you need for your iOS/iPadOS and Android apps in about a second. Here is how you can install and use Sharp-AppIcon. Make sure you have Node.js installed on your computer. Then you can NPM install sharp-appicon globally using the following command;
$ npm install sharp-appicon -g
Once it finishes install this module, you can execute it in the command line using appicon command. You just need to navigate to the location of your source icon. It should probably be an image with the dimensions of 1536 pixels by 1536 pixels. Lets’ say your icon is called MyAppIcon.png. You can create your appicons by running the following command;
$ appicon MyAppIcon.png
This will create a directory called ‘icons’ with all of the icons required for your iOS/iPadOS and Android apps. Watch the video below to see how to use this utility.
Conclusion
It is extremely practical to use Node.js for creating thumbnails, creating simple operations and cropping and saving your images into different formats. You do not have to use these modules, and you can choose to use modules that work with GraphicsMagic and ImageMagic as well.